Migrate from DOMOS6 to DOMOS7
General information
This manual will guide you through the migration process.
There are two supported methods for migrating an existing system from DOMOS6 to DOMOS7. The recommended approach is to use the Migrationtool (ROUTE 1), which provides an automated and validated migration process with minimal manual interaction. Alternatively, the migration can also be performed manually by transferring the required configuration and data.
Whenever possible, the Migrationtool should be preferred to ensure consistency and reduce the risk of configuration errors.
Before starting the migration, make sure to save the encryption key from the old Qiata system, if one is configured.
The encryption key need to be entered again manually after the migration process has completed.
Route 1 [recommended]
The DOMOS Migrationtool enables a direct migration between two Qiata (DOMOS) systems without requiring any additional client or server infrastructure. The source and target systems communicate directly with each other, which simplifies the migration process and significantly reduces deployment effort and migration time.
This approach minimizes external dependencies and allows migrations to be performed in a streamlined and efficient manner.
A detailed description of the migration workflow and configuration can be found in the DOMOS Migration Tool documentation.
Route 2
TL;DR
The following TL;DR section is intended for experienced administrators only. Optional steps, additional explanations, and environment-specific details may be omitted for brevity.
For a complete step-by-step migration guide, including all required details and recommendations, refer to the detailed sections further below in this documentation.
-
Update old system to the latest version with DOMOS
-
Create Configuration-Backup via Backup/Restore -> Configuration -> Create new configuration backup
-
Create a new job for BackupClient via BackupClient -> Backup Client Jobs -> Add backup job
-
Download Client configuration and Backup Client software (Windows or Linux)
-
Create backup via
bakresclient -config PATH-TO-CONFIGFILE -bakdir BACKUP-DIRECTORY
-
Install new DOMOS7 system with latest ISO from SECUDOS website
-
Import Configuration-Backup via Backup/Restore -> Configuration -> Configuration Restore
-
Download new Backup Client software based on DOMOS7 (Windows or Linux)
-
Activate the Restore function via Backup/Restore -> Backup Client -> Backup Client Server -> Restore Status (activate toggle) in the new system
-
Restore backup via
bakresclient -config PATH-TO-CONFIGFILE -resdir BACKUP-DIRECTORY
-
Reboot the system to finish the restore process
-
Install your new DOMOS license
Preparation
Before you migrate an exisiting Qiata installation, you have to install all available updates and then create a backup of the system configuration.
Backup
Login to the DOMOS WebUI. The DOMOS WebUI is available using the address https://IP-OF-YOUR-APPLIANCE:10000.
Configuration Backup
Once you’re logged in, go to Backup/Restore → Configuration and click on the button Create new configuration backup in the Configuration Backup-Section.
Now you can download a file called configuration.dat. This file contains the configuration of the DOMOS system and the Qiata software.
This backup consist of:
- all DOMOS configuration (including all users)
- email templates (including custom templates)
- pages templates
- all images
- necessary configurations
- databases (excluding transfer related ones)
This Backup does not include any multispace files nor uploaded files. Thus it also does not include any transfer related database information, for example transferdb.
More information can be found here: Config-Backup
Keep the configuration.dat in a safe place. It contains all the important information you need to restore the system.
Data Backup
Backup via Backup client [recommended]
The DOMOS backup client, available for Windows and Linux, enables easy pulling of a backup from the DOMOS system and writing of a restore to the DOMOS system. The backup client must be started on an external system and automatically connects to the DOMOS system. The backupclient program is designed to use in batch scripting or running by a backup system automatically.
If the bakresclient binary is not executable (on UNIX systems), adjust the file permissions before running the command:
chmod +x bakresclient

Shown is an example Backup started on Windows.
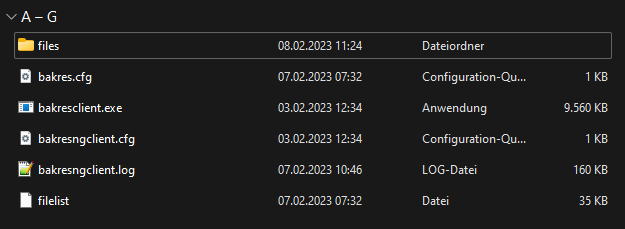
Shown is an example of a finished Backup within Windows Explorer. In the data structure under \files\var\lib\fta\company\default you will find all files and configurations that have been saved.
The usage of the Backup client can be found here: Backup/Restore Client.
This backup consist of:
- email templates (including custom templates)
- pages templates
- all images
- necessary configurations
- all databases
- all uploaded files (depending on the job with or without MultiSpace)
Backup to FTPS
Unlike the Backup client, the backup involves moving files to a specific destination instead of pulling them.
The usage of the Backup client can be found here: Backup to FTPs.
This backup consist of:
- email templates (including custom templates)
- pages templates
- all images
- necessary configurations
- all databases
- all uploaded files (depending on the job with or without MultiSpace)
Prepare installation of virtual appliances
ISO-Image
If you do not have a DOMOS7 installation image (ISO image), please download a copy from https://www.secudos.de/en/help-and-support/downloads/category/1-qiata. Please note that a registered user account is necessary to obtain the update.
- Create a virtual guest for the Appliance.
System Requirements
Disk
- Minimum size: 10 GB
- Use either VirtIO or VirtIO SCSI as the disk controller
Memory
4096 MBRAM, more recommended- Memory ballooning is supported
CPU
- Requirement: 64-bit x86 processor with support for the x86-64-v3 architecture, including the AVX2 instruction set
- Proxmox: Use
x86_64_v3orhostif the hardware platform is sufficiently modern - Hyper-V: Current versions are compatible by default
Network
- At least one network interface is required
- Use VirtIO-Net as the network adapter type
- A static MAC address is required
More resources are recommended.
- Ensure that you boot from the CD image (ISO) supplied by SECUDOS. Perform a plain installation from the CD image without applying any changes from the virtual hosting software (e.g. setting IP address during the installation). Please avoid using templates provided by your virtualization software. The installation will start automatically after a few moments.
The setup does not require any input or interaction. Once the setup procedure has completed, the virtual appliance will restart. You have now successfully installed Qiata. You may now proceed with restoring the configuration/data files.
Please note that the Secure-Boot function must be disabled for the virtual machine.
Supported Virtual Hostsystems
| Hostsystem | Minimal Version |
|---|---|
| VMware | ESXi 7.0 Update 3 |
| Hyper-V | Windows Server 2019 (Gen 2 recommended) |
| Linux | Qemu 6.2+ |
Restore
Before restoring the configuration backup, the new system immediately adopts the IP configuration of the original system. To avoid IP address conflicts, the old system must be shut down before the restored system becomes active on the network.
Restore configuration
Login to the DOMOS WebUI. The DOMOS WebUI is available using the address https://IP-OF-YOUR-APPLIANCE:10000. You can use the tool DomosNetConf to do a simple IPv4 network configuration using the console after gaining root privileges.
Open Backup/Restore → Configuration → Config Restore. Now upload the configuration backup (configuration.dat) downloaded at Create configuration Backup.
Once the restore has been successfully completed, you will see the message Restore done in the status display. Now reboot the system to complete the restore.
Keep in mind that restoring the configuration may also set a new primary IP address for the system. So make sure that there is no address conflict.
Restore data
Before starting the restore process, enable restore mode on the target system:
Backup/Restore -> Backup Client -> Backup Client Server -> Restore Status (activate toggle)
The restore operation cannot be started until this setting is enabled.
Restore via Backup Client [recommended]
To restore all files to the system, the Backup client can be used. As with the backup, this is controlled via the CLI and can point to a directory that is used for the restore with the parameter -resdir.
 Shown is an example Restore started on Windows.
The usage of the Backup Client can be found here: Backup/Restore Client.
Please make sure to reboot the system after a successful restore. This is mandatory for correct operation.
Please note that the encryption key (if available in the old Qiata) may have to be re-entered after a migration!
Restore from FTPS
To restore all files from a FTPS server, first log in to the DOMOS WebUI. Go to Backup/Restore -> Data Restore and click on Scan to begin searching for available backups on the target host. If the data restore was not preceded by a configuration restore, you must first define an appropriate target at Backup/Restore -> Data Backup -> Targets.
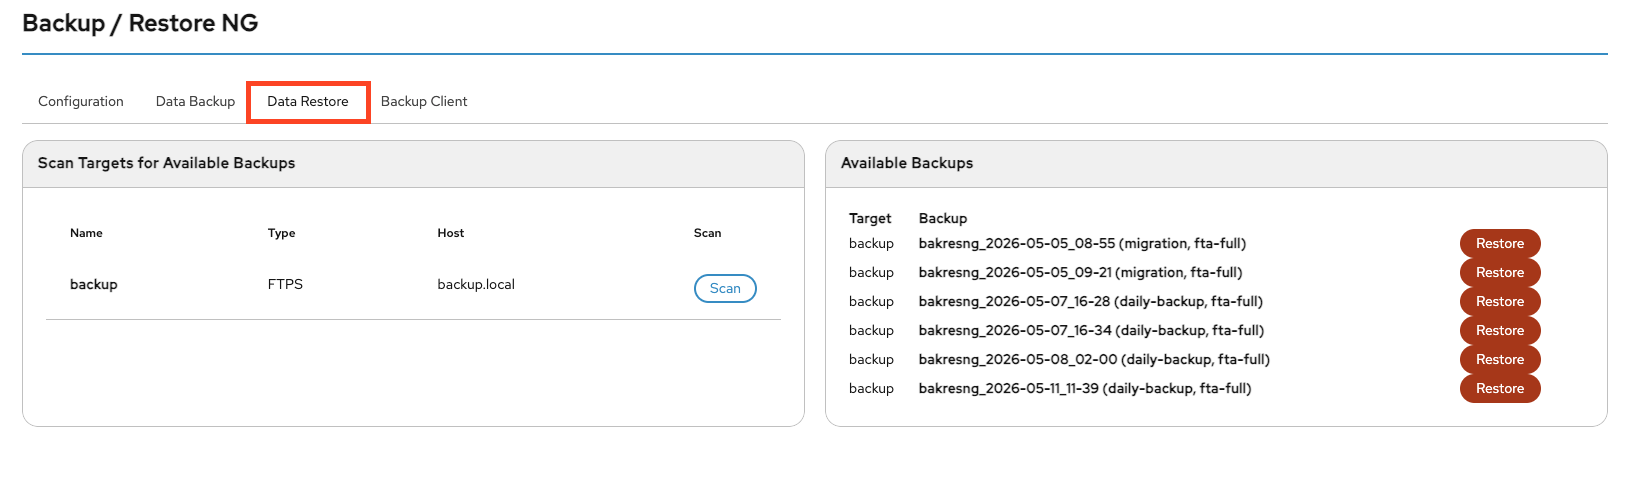
Select the desired backup and click Restore. The process may now take some time (depending on the data size). After a successful restore, you will receive a corresponding success message.
The usage of the Backup Restore can be found here: Restore from FTPs.
Please make sure to reboot the system after a successful restore. This is mandatory for correct operation.
Please note that the encryption key (if available in the old Qiata) may have to be re-entered after a migration!
License information
Unlike previous migrations to DOMOS6, no new license is required when migrating to DOMOS7. Existing licenses remain valid and can continue to be used without any manual reactivation or replacement.
After the migration or reinstallation process, the existing license will be retained automatically.